If you participated in the XRP snapshot that took place on December 12, 2020, you can claim your FLR tokens. Simply fill out the request form and enter an address compatible with the Flare network to withdraw your tokens.
To give some context, Flare Token is the native cryptocurrency of the Flare network. The Flare network is a smart contract platform that aims to allow interoperability between different blockchains, including Bitcoin and XRP.
Flare Token (FLR) is used for several purposes within the Flare network, for example as a way to pay for transaction fees and to incentivize network nodes (people, organizations and devices on the network) to contribute actively to it and promote its growth and efficiency.
In addition, the Flare network announced plans to distribute Flare Tokens to eligible XRP holders. This distribution of Flare tokens to XRP holders is done through a process known as “Flare Network Snapshot”, in which eligible holders’ XRP balances are recorded at a specific point in time.
What does this mean?
In November 2020, we announced that Bitso would participate in the XRP snapshot carried out by the Flare team. This means that if you had XRP balance available in your Bitso account on December 12, 2020 at 00:00 GMT or at 18:00 CT on December 11, you also participated in the snapshot, and you can directly request the tokens issued by Flare from us.
After a couple of years, Flare made the long-awaited airdrop on January 9 of this year and Bitso is more than ready to send your FLR tokens if you were part of this snapshot. Bitso wants to make sure that you get a simple, seamless and cost-free experience when receiving your FLR tokens. Therefore, it is possible that Bitso has taken a little longer to send the tokens in order to prioritize the security of users at each stage of the process. To ensure that the feature is fully protected, extensive testing and further improvements have been made to the delivery system.
To receive your FLR tokens, you only have to provide an address that is compatible with the Flare network where you want to withdraw your tokens, and we will send them to you in a couple of minutes.
To claim your FLR tokens, you will need to fill out the request form that we will email to our eligible users. The FLR token will not be listed directly on Bitso, so you won’t be able to receive the deposit directly in your Bitso wallet. Therefore, it is extremely important that you complete this process within the next six months to guarantee access to your tokens.
Once you have filled out the form, you will receive 0.1511 FLR for every XRP token you had in your Bitso balance at the time of the snapshot. All tokens will be sent to your Flare-compatible address within minutes!
In order to complete the application form, you need an address that is compatible with the Flare network where we can send you your FLR tokens. We will send the tokens to the wallet of your choice, but it is important to note that not all wallets are compatible with transactions on the Flare network. We recommend using any of the following wallets to get your Flare-compatible address: MetaMask, Bifrost Wallet, Cobo Vault, D’CENT Biometric Wallet, Trezor, Ledger Nano X and Ledger Nano S.
In this blog post, we provide a basic tutorial on how to get your Flare compatible address via the MetaMask wallet. This way, we will be able to transfer your FLR tokens to your personal wallet. We chose MetaMask for its accessibility and ease of use, as well as its compatibility with hardware wallets, such as Ledger.
Please note that this is only one way to obtain an address that is compatible with the Flare network. Each user is responsible for completing this process in a timely manner and confirming that the address provided is indeed compatible with the Flare network.
Flare network set up in MetaMask
Before you can send and receive FLR tokens, you need to adjust some settings in the MetaMask app.
The following steps are meant to set up the Flare network in the Metamask wallet through their web, but the same steps can be completed in the iOS and Android apps.
- Step 1: Download the MetaMask wallet on the device of your choice. In this example, we will use the Chrome extension, but the process is very similar on other browsers and devices.
- Step 2: Once the download is complete, it is extremely important to store your private keys somewhere safe. These keys will be used to access your funds on another device if necessary.
Avoid saving your keys on the same device you used to set up your wallet, as it will not be possible to regain access if the device is lost or broken.
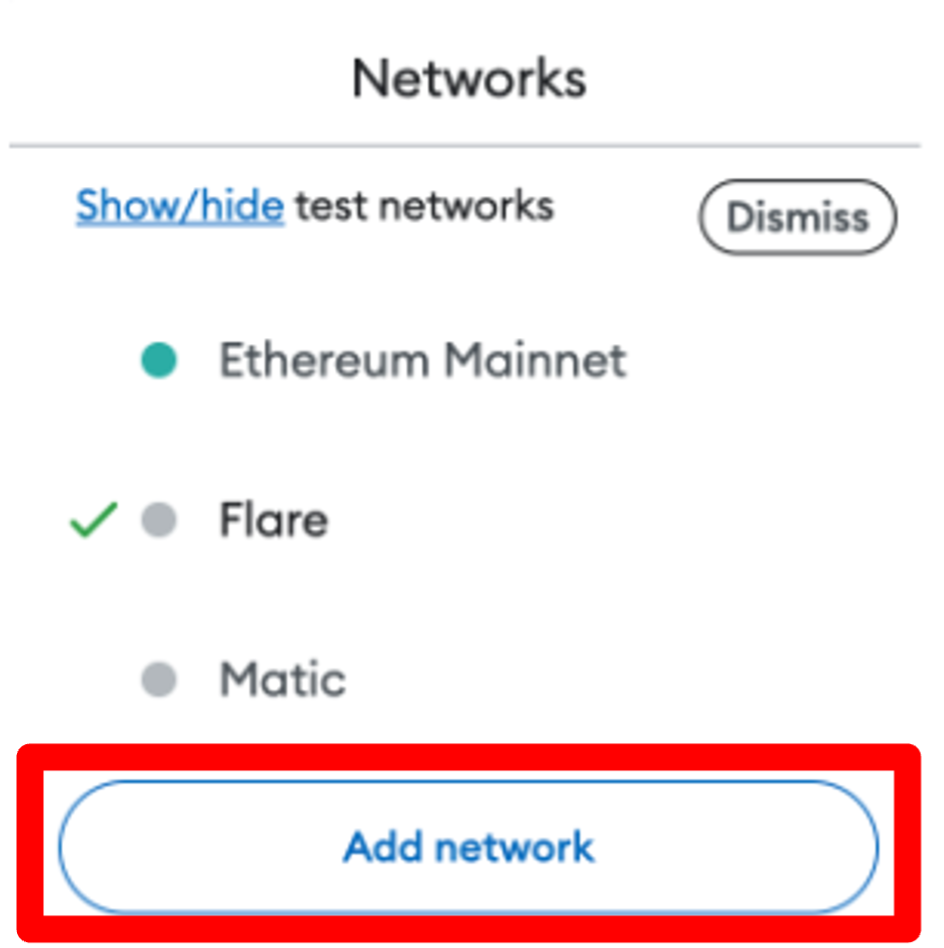
- Step 3: Upon completing the registration process, you will need to open the MetaMask app and click on “Ethereum Mainnet”.
- Step 4: Next, a menu will be displayed. Choose the “Add a network” option. This will take you to a full screen where you should click again on “Add a network manually”. This will allow us to add a custom RPC type network which, in this case, will be Flare.
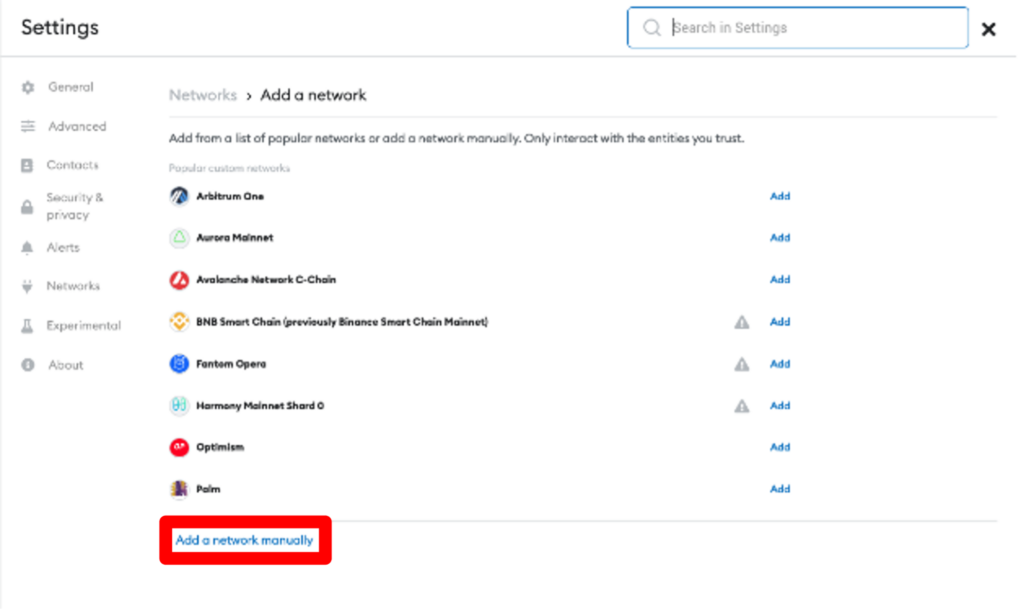
- Step 5: Once you choose the “Add a network manually” option, some blank fields will appear. Complete this section by entering the information corresponding to the Flare network.
| Network name: | Flare |
| New RPC URL: | https://flare-api.flare.network/ext/C/rpc |
| Chain ID: | 14 |
| Currency ticker: | FLR |
| Block Explorer: | https://flare-explorer.flare.network |
- Step 6: Click on the “Save” button.
- Step 7: Finally, it is important to confirm that the Flare network is now available in your MetaMask wallet. If you can see the active Flare network, you can already receive FLR.
How to get your Flare-compatible address to receive your FLR
Once you have set up the Flare network in MetaMask, getting your Flare-compatible address to start sending and receiving FLR Flare tokens is super simple.
First, you need to open the Metamask app and make sure you have the Flare network selected. You will be able to see the name of the wallet together with a series of characters, which are the address that corresponds to that wallet, as shown below.
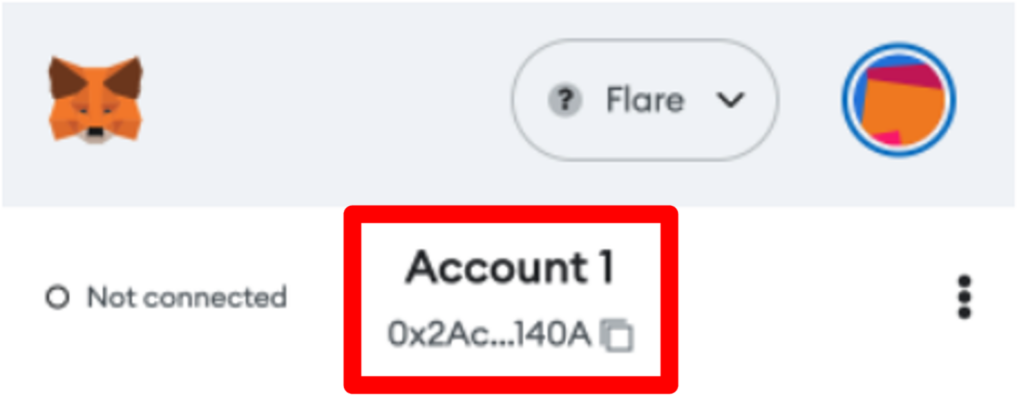
Now, all you have to do is click on the wallet name and your Flare-compatible address will be copied automatically. This is the address you must enter in the request form in order to claim your FLR tokens through Bitso. Remember, this process can also be completed on other wallets that are compatible with the Flare network.
We thank you for trusting Bitso throughout the entire FLR token distribution process. We are very excited to be able to support crypto projects so relevant to our community. We hope you enjoy your Flare tokens!
